Sunday, May 14, 2017

Happy Mother's Day

Happy Mother's Day!  This is a classic example of taking a project that you are already teaching in the classroom and adding a component of technology into the lesson.  For Mother's Day, my students always write an acrostic poem for their mothers as a present.  We use the following template below:

Usually, the students write their poem in their best handwriting on the template above.  I take a nice picture of each student outside, and they glue everything on a large piece of colored construction paper and add decorations with markers.  

This year, the students wrote a rough draft using the template above.  I assigned a blank Google Drawings Document through Google Classroom and allowed the students to design their poem however they wanted.  See an example of their work below:


I assigned the Google Drawing as a landscape document.  Some of the students struggled with fitting the whole poem on the page.  Next year, I will assign the project as a portrait so that the students have more room.  Even if the student did not fit the poem on the page, their project still turned out great.  I think it added a special artistic touch.  


For the finished gift, I asked the students to glue their poem along with their picture on a large sheet of colored construction paper and decorate the paper with markers.  Yes, I could have allowed the students to insert the picture into the Google Drawings Project and kept the project completely digital.  However, I wanted to allow the students to showcase their drawings which added a personal touch.  I hope this gift becomes a treasured keepsake for the mothers.

Tuesday, April 25, 2017

HyperDocs in the Elementary Classroom

Happy Earth Day!  This week my class explored how to reduce, reuse, and recycle through a HyperDoc created in Google Slides.  The document contained links that took the students to different YouTube videos that explained about reducing, reusing, and recycling.  After viewing the videos, the students returned to the HyperDoc to display what they learned and explain the topic to others.  Here is the blank HyperDoc assigned to the students.


What is a HyperDoc?
A HyperDoc is a document that contains links for the students to access information to learn more about a topic.  The HyperDoc also contains a space in which the students can interact with the information and display their learning.  HyperDocs can be created using any program in which a link can be inserted; therefore, Google Docs, Google Drawings, Google Slides, and Google Sheets are great resources to create HyperDocs.

Lesson Learned from Using HyperDocs
Not every lesson that I share with the students work as planned.  I copied the links used in the HyprDoc from the share tab on YouTube.  All of the links worked on my computer, but when the students tried the links on their own, they were not able to access the videos.  Something was blocking the videos.  I decided to show the first video whole group while I investigated the problem.

After problem solving with the Digital Learning Coach on campus, we changed the links in the HyperDoc to match the links in the Omnibox (address bar).  Thank you @richesonemily for your help.  I learned the lesson to always check your links under a student login before assigning the project to the students.

Benefits of Using HyperDocs in the Classroom
First, using HyperDocs increases student engagement.  Students enjoy watching the YouTube videos about various topics.  From the moment we started the HyperDoc project, the students were glued to their Chromebooks learning and sharing the information that they learned.

HyperDocs also allows students to work at their own pace.  We all know that students work at different speeds.  When a student completes one page, they are able to move onto the next page and watch the next video without waiting for the rest of the class.  Students can also watch the video again if they need to see the information more than once.  

Students are working independently.  All of the information that they need is in the HyperDoc.  Therefore, students are able to collect the information on their own and share what they learn through the project.

Overall, the students did a great job learning about ways to reduce, reuse, and recycle.  Check out the completed project below.


Saturday, April 15, 2017

Storytelling with Osmo Monster

Osmo Monster is a perfect example of combining creativity and technology.  My students absolutely love storytelling with Monster on the Osmo Gaming System.  In fact, they constantly ask when we are going to work with Monster again in the classroom.

Osmo Monster is simple for the students to use.  Mo the Monster leads the students while he tells a story.  He asks the students to draw pictures, and he magically pulls their drawings onto the screen.  The students love working together with Mo to tell a story.


Students work collaboratively in partners while working on Osmo Monster.  Osmo suggests using a special draw erase board or blank paper.  We did not have access to clean dry erase boards, so our class used blank paper.  At first, I was concerned about how much paper the students were using.  Only one picture is drawn per paper; therefore, we were going through a lot of paper even when the students drew on both sides.  We finally decided to cut the paper in half.  A half sheet of paper was big enough for the students' drawings, but allowed us to save paper.  Thank you @RichesonEmily for the suggestion.

I love watching the students work together.  Some students chose to take turns drawing the pictures while other students actually drew the pictures together.  One group even asked if they could color their pictures, and sure enough, their drawings came to life on the screen in color.  The next thing you knew, everyone had their crayons out so that they could color the picture too.

To use Osmo Monster, you only need the Osmo Game System.  The Osmo Game System includes the base that the iPad sits in as well as the red reflector piece that attaches to the top of the iPad.  The Osmo Game System sells for $19, making it a very affordable option for the classroom.


Saturday, April 8, 2017

10 Makerspace Tips for the Elementary Classroom

This year, my first grade class started creating projects in Makerspace to display their thinking about a topic.  Here are some tips for incorporating Makerspace into the elementary classroom.
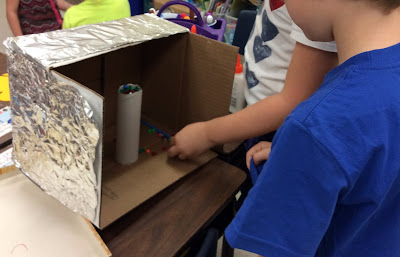
Students create a slushy machine for their house. 

1. It Is All About the Conversations, Not the Product
Sometimes you look at a student's project and think, what is that?  However, when you ask the students about their project, all of a sudden, what you are looking at makes sense.  The students are able to explain the process that they used to create the project and their thinking behind the project.  This is the goal of Makerspace: students working together to make a creation to display their thinking.

2. Planning Is Important
I like to give my students time to think about their task before they start building their creation in Makerspace.  Planning can be completed on a sheet of paper or a computer.  In my classroom, students work collaboratively to make plans in Google Drawings.  It is amazing to see how much their finish product resembles their plan.

3. Utilize a Parent Volunteer to Help with the Hot Glue Gun and Sharp Scissors
Have you ever tried to glue anything to a tin can or cut the top off a plastic milk jug?  Asking a parent to help with the hot glue gun and sharp scissors may sound silly, but theses tasks are important when working with young students in Makerspace.  Allowing a volunteer to help with these tasks frees the teacher to roam around the room and have those meaningful conversations with students about what they are thinking as they create their projects.

4.  Students Need to Try Before They Ask for Help
Some students become dependent on the teacher or parent volunteer to complete simple tasks.  Therefore, our class has incorporated the rule that students need to try first before asking the volunteer (or anyone) for help.  This helps the students develop independence and increase problem solving skills.

5. Have Something for Students to Complete When They Finish
I've learned this one the hard way, twice.  I have been deep in conversation with students about their creation.  All of a sudden, I look up and a lot of the students in the room are in mass chaos.  Students are finished with their creation and roaming around the bothering other students and hindering progress.  Students need an assignment when they finish their Makerspace project.  Some ideas are writing about their creation, making an advertisement for their creation, or explaining the process they used to make their creation with a storyboard.

6. Be Prepared to Be Messy and Allow Time for Clean Up
Creating projects in Makerspace is messy.  It seems that all of the materials available to the students either end up on the tables or on the floor.  However, it is the students' responsibility to clean up.  Make sure to plan 10 to 15 minutes for clean up.

7. Reserve Time for Plussing and Revision
Plussing is an opportunity for students to receive feedback about their creation.  In our classroom, we complete plussing as a whole group but other teachers do this activity in small groups.  Students bring their project to the group, and students tell the creator something that they like about the project and something that they wish the creator would improve.  It is important for students to hear the constructive criticism and use these ideas to make their project better.  After plussing, students are given 20 minutes to revise their project.  They are required to pick one idea that they received during plussing to improve their creation during revision.
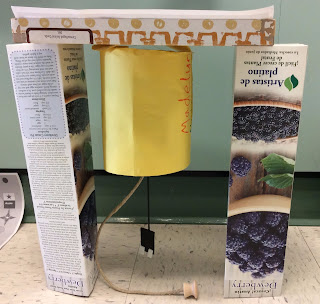
This is a rechargeable light bulb for when the electricity goes out.  Before plussing, the students held the light bulb upside down.  During revision, the students made a stand for the light bulb so that it could hang upside down on its own. 

8.  Students Will Use What You Have to Create Their Projects

When collecting items for Makerspace, I was worried about having the "right stuff" for the students to create their projects.  However, I learned that students have an idea in their head, and they will use the items around them to make their creation.  Students do not mind using the box with Amazon Prime tape across the front.  They will adapt and use what is available to them.

9. Teach Students to Only Use What They Need
Sometimes the students' eyes get too big for the task that they need to accomplish.  They will always want to pick the biggest box and the coolest design items.  However, it is important to remind students to use only what is important to their project.  I also teach students to return any pieces that they do not use so that others can use them in their project.  Makerspace is all about reusing and recycling.

10.  Makerspace Looks Different in Every Classroom
Right now, there are three first grade teachers piloting Makerspace in our school.  Makerspace looks different in all three classrooms.  Therefore, it is important to customize Makerspace for your classroom.  Jump in and see what works for you.

Thank you to Amber Dixon and Teresa Jay for going on the Makerspace journey with me.  They have spent countless hours reflecting and revising the Makerspace process with me for our classrooms.

Monday, March 27, 2017

Working Collaboratively with Google Drawings

This week the students were asked to identify a problem and create an invention to solve the problem.  The students worked collaboratively in partners to make a plan for their invention in Google Drawings.


The students worked on the same Google Drawings document.  They were excited to see how when they changed something on their screen, it also changed on their partner's screen.  This was a great way for the students to share their knowledge of using the Chromebooks with others.

A few of the groups struggled with working on the same document.  It was important for both students to agree on the same vision for their invention before they started working together on the collaborative document.  When some of the students became frustrated with their partner, we took a quick break from the project and had a conversation about respecting one another's work.

Each group was assigned a blank Google Drawings document in Google Classroom.  I had ten different groups; therefore, I had ten different assignments.  I used the differentiation feature in Google Classroom to assign partners to the same assignment.  When the Google Drawings document was attached, I choose the option for students to edit the file so that both of the students could work on the same document. 


The plan created by the students was going to be used the next day to build the invention in Makerspace.  It is amazing to see how some of the students followed the plan to build their invention.  Below are a few of the plans with the finished product.  The first invention is a snow machine (to be used in the summer of course), and the second invention is a toy for a child who does not have any toys. 


Wednesday, March 15, 2017

Collaborative Learning with Osmo on the iPad

My teaching goal this year is to increase collaboration among students by using technology.  The Osmo Gaming System is the perfect solution to help me reach this goal.  Students work in partners during math workshop and reading workstations.  The students love working together on the Osmo.


Here is the story that made me fall in love with the Osmo Gaming System.  On the day before Christmas break when half of the class had already left, I decided to test Osmo with a few of the students.  I paired up two boys to play Osmo Words.  These two boys are often rough and difficult to get along with, but there were not many students left in the classroom.  To my amazement, they started working together building words based on the picture clues, and believe it or not, they actually got along and worked well together.  In my experience with Osmo, I have found that even the most challenging students work well together because they are challenged and actively engaged.

I use three of the Osmo Gaming Systems for collaborative learning during workstation time.  During math workshop, I switch between Osmo Numbers and Osmo Coding.  For reading workstations, my students work together to practice their spelling words with Osmo Words.  Below are descriptions of each game.

Osmo Numbers asks students to combine numbers in order to reach a target number (see picture above).  There are dot tiles (up to 5) and number tiles (1-9).  Osmo Numbers is perfect for collaboration between partners because each partner has a their own set of numbers; therefore, if the students want to make 10 using a double, they both have to use their own 5 tile.

Osmo Coding is a favorite among students because it is presented like a video game.  Students use tiles to write code for Awbie, a marshmallow looking character who loves to eat strawberries.  After students create the code for Awbie to complete a task, they push play to see if their directions were correct.  If there is a mistake in the code, students have to rethink and rewrite their code which promotes problem solving.


Osmo Words is similar to hangman but with picture clues.  Each student has a set of letter tiles from A to Z.  A picture is displayed on the screen with blanks representing each letter in the word.  Students have a given number of guesses until the game is over.  What I love about Osmo Numbers is that the picture clues are not obvious.  For example, there might be a picture of an adorable puppy, but the missing word is four letters long (cute).  The students have to problem solve together to figure out the word.

It is very easy to create your own word albums on MyOsmo, and there are a lot of already pre-made word albums for you to choose from.  I create my own word albums for the students to practice their spelling words.

Some of the game sets have a lot of pieces, and the game pieces are easily lost.  I have trained my students to clean up the pieces with caution, checking the floor and desks to make sure that they have put all of the pieces away.  There have been numerous times when I have found a missing tile on the floor.

The good news is Osmo will replace missing tiles according to their website.  I have not tried to replace any tiles yet, but it gives me an added piece of mind when the students use the Osmo Gaming System in the classroom.


Friday, March 10, 2017

A Practical Application of Google Classroom

I love using Google Classroom as a platform for my students to access their assignments.  It is quick to set up and easy for students to use.  Here is an example of a lesson in which I use a digital worksheet and assign it through Google Classroom.

Our topic in math focused on the relationships between coins.  The lesson started with a YouTube video reviewing the value and relationships of different coins.  After the video, the students completed the digital worksheet below.  All components of the lesson were assigned to the students using Google Classroom.


This digital worksheet was created using Google Drawings.  On the left, the images of coins are piled up on top of one another.  The student drags the equivalent amount of coins to each box.  Below is the original worksheet in which students drew pennies, nickels, and dimes to show equivalent amounts that inspired the creation of the digital worksheet above.  


Here are the steps I used for creating the lesson in Google Classroom.  Make sure that you assign the components of the lesson in the order that you want the students to complete the activities.  

First, I assigned the YouTube video with the insert video link.  Then, I assigned the coin sorter activity from Google Drive.  Make sure to pick the option Make a copy for each student.  This will assign each student's name to a different file and allow students to work independently on their own document.  


When students have completed the assignment, they have the option to Turn It In.  This feature alerts the teacher that the student has completed their assignment, and gives the teacher access to the finished product to assign a grade if desired.  

Below is the coin sorter activity completed by a student.  A big thank you to Emily Turner for creating the digital worksheet used in this lesson.