Showing posts with label things you can do with technology. Show all posts

Wednesday, June 7, 2017

Creating Videos on the Chromebook

An important part of Writing Workshop is for the students to see themselves as writers; therefore, it is important for the students to publish their writing in a meaningful way.  My first grade students wrote their first book, and we celebrated their writing by creating a video on the Chromebook.


The video captured the students as authors reading their published book.  The students used the video recorder on 123apps.  123apps is free and allows students to download their recorded video to Google Drive.  I assigned the link to the video recorder through Google Classroom. 

The students loved everything about this assignment.  They felt like real authors because they were creating a video about a book they wrote.  As you can see from the videos below, student personalities emerged when they were creating the videos.


When students start to record the video, the program asks for permission to allow access to the camera and microphone.  Students have to choose the green allow button for the video recorder to work properly.  Some of the students had trouble with hearing the sound when they watched the video. After troubleshooting the problem, I realized that they did not grant access for the microphone.  Make sure the students complete this step carefully, or the video recorder will not work properly. 

Before recording their published writing, allow the students to make a test video.  This allows the students to check the volume level and make sure that everything is working properly before they put all of their effort into recording the perfect video.  We learned that students can talk in a quiet voice while recording and turn the volume up with their headphones on when they watch the video.

When students are finished recording, ask them to watch their video to make sure it is just how they like it.  They can always record it again if needed.  Sometimes it takes the video recorder a long time to process while it is saving the video, especially if the video is long.  The students need to be patient because it will finish processing eventually.

Once the students are happy with their video, they can push the green save button and select Google Drive to download the video.  When the video is safely stored in their Google Drive, I ask the students to share their video with a partner.  


Please note that 123apps is a free website and contains ads.  One of the ads was for a dating site that used an image of a woman that was not appropriate for school.  The instructional technologist on our campus installed an ad blocker on the student computers so the students could not see the ads when using the video recorder.

Sunday, May 14, 2017

Happy Mother's Day

Happy Mother's Day!  This is a classic example of taking a project that you are already teaching in the classroom and adding a component of technology into the lesson.  For Mother's Day, my students always write an acrostic poem for their mothers as a present.  We use the following template below:

Usually, the students write their poem in their best handwriting on the template above.  I take a nice picture of each student outside, and they glue everything on a large piece of colored construction paper and add decorations with markers.  

This year, the students wrote a rough draft using the template above.  I assigned a blank Google Drawings Document through Google Classroom and allowed the students to design their poem however they wanted.  See an example of their work below:


I assigned the Google Drawing as a landscape document.  Some of the students struggled with fitting the whole poem on the page.  Next year, I will assign the project as a portrait so that the students have more room.  Even if the student did not fit the poem on the page, their project still turned out great.  I think it added a special artistic touch.  


For the finished gift, I asked the students to glue their poem along with their picture on a large sheet of colored construction paper and decorate the paper with markers.  Yes, I could have allowed the students to insert the picture into the Google Drawings Project and kept the project completely digital.  However, I wanted to allow the students to showcase their drawings which added a personal touch.  I hope this gift becomes a treasured keepsake for the mothers.

Tuesday, April 25, 2017

HyperDocs in the Elementary Classroom

Happy Earth Day!  This week my class explored how to reduce, reuse, and recycle through a HyperDoc created in Google Slides.  The document contained links that took the students to different YouTube videos that explained about reducing, reusing, and recycling.  After viewing the videos, the students returned to the HyperDoc to display what they learned and explain the topic to others.  Here is the blank HyperDoc assigned to the students.


What is a HyperDoc?
A HyperDoc is a document that contains links for the students to access information to learn more about a topic.  The HyperDoc also contains a space in which the students can interact with the information and display their learning.  HyperDocs can be created using any program in which a link can be inserted; therefore, Google Docs, Google Drawings, Google Slides, and Google Sheets are great resources to create HyperDocs.

Lesson Learned from Using HyperDocs
Not every lesson that I share with the students work as planned.  I copied the links used in the HyprDoc from the share tab on YouTube.  All of the links worked on my computer, but when the students tried the links on their own, they were not able to access the videos.  Something was blocking the videos.  I decided to show the first video whole group while I investigated the problem.

After problem solving with the Digital Learning Coach on campus, we changed the links in the HyperDoc to match the links in the Omnibox (address bar).  Thank you @richesonemily for your help.  I learned the lesson to always check your links under a student login before assigning the project to the students.

Benefits of Using HyperDocs in the Classroom
First, using HyperDocs increases student engagement.  Students enjoy watching the YouTube videos about various topics.  From the moment we started the HyperDoc project, the students were glued to their Chromebooks learning and sharing the information that they learned.

HyperDocs also allows students to work at their own pace.  We all know that students work at different speeds.  When a student completes one page, they are able to move onto the next page and watch the next video without waiting for the rest of the class.  Students can also watch the video again if they need to see the information more than once.  

Students are working independently.  All of the information that they need is in the HyperDoc.  Therefore, students are able to collect the information on their own and share what they learn through the project.

Overall, the students did a great job learning about ways to reduce, reuse, and recycle.  Check out the completed project below.


Saturday, April 15, 2017

Storytelling with Osmo Monster

Osmo Monster is a perfect example of combining creativity and technology.  My students absolutely love storytelling with Monster on the Osmo Gaming System.  In fact, they constantly ask when we are going to work with Monster again in the classroom.

Osmo Monster is simple for the students to use.  Mo the Monster leads the students while he tells a story.  He asks the students to draw pictures, and he magically pulls their drawings onto the screen.  The students love working together with Mo to tell a story.


Students work collaboratively in partners while working on Osmo Monster.  Osmo suggests using a special draw erase board or blank paper.  We did not have access to clean dry erase boards, so our class used blank paper.  At first, I was concerned about how much paper the students were using.  Only one picture is drawn per paper; therefore, we were going through a lot of paper even when the students drew on both sides.  We finally decided to cut the paper in half.  A half sheet of paper was big enough for the students' drawings, but allowed us to save paper.  Thank you @RichesonEmily for the suggestion.

I love watching the students work together.  Some students chose to take turns drawing the pictures while other students actually drew the pictures together.  One group even asked if they could color their pictures, and sure enough, their drawings came to life on the screen in color.  The next thing you knew, everyone had their crayons out so that they could color the picture too.

To use Osmo Monster, you only need the Osmo Game System.  The Osmo Game System includes the base that the iPad sits in as well as the red reflector piece that attaches to the top of the iPad.  The Osmo Game System sells for $19, making it a very affordable option for the classroom.


Saturday, April 8, 2017

10 Makerspace Tips for the Elementary Classroom

This year, my first grade class started creating projects in Makerspace to display their thinking about a topic.  Here are some tips for incorporating Makerspace into the elementary classroom.
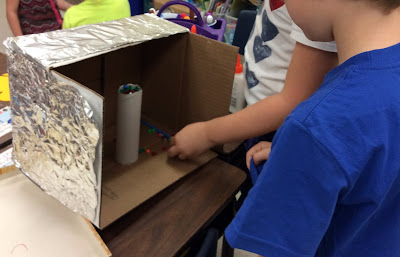
Students create a slushy machine for their house. 

1. It Is All About the Conversations, Not the Product
Sometimes you look at a student's project and think, what is that?  However, when you ask the students about their project, all of a sudden, what you are looking at makes sense.  The students are able to explain the process that they used to create the project and their thinking behind the project.  This is the goal of Makerspace: students working together to make a creation to display their thinking.

2. Planning Is Important
I like to give my students time to think about their task before they start building their creation in Makerspace.  Planning can be completed on a sheet of paper or a computer.  In my classroom, students work collaboratively to make plans in Google Drawings.  It is amazing to see how much their finish product resembles their plan.

3. Utilize a Parent Volunteer to Help with the Hot Glue Gun and Sharp Scissors
Have you ever tried to glue anything to a tin can or cut the top off a plastic milk jug?  Asking a parent to help with the hot glue gun and sharp scissors may sound silly, but theses tasks are important when working with young students in Makerspace.  Allowing a volunteer to help with these tasks frees the teacher to roam around the room and have those meaningful conversations with students about what they are thinking as they create their projects.

4.  Students Need to Try Before They Ask for Help
Some students become dependent on the teacher or parent volunteer to complete simple tasks.  Therefore, our class has incorporated the rule that students need to try first before asking the volunteer (or anyone) for help.  This helps the students develop independence and increase problem solving skills.

5. Have Something for Students to Complete When They Finish
I've learned this one the hard way, twice.  I have been deep in conversation with students about their creation.  All of a sudden, I look up and a lot of the students in the room are in mass chaos.  Students are finished with their creation and roaming around the bothering other students and hindering progress.  Students need an assignment when they finish their Makerspace project.  Some ideas are writing about their creation, making an advertisement for their creation, or explaining the process they used to make their creation with a storyboard.

6. Be Prepared to Be Messy and Allow Time for Clean Up
Creating projects in Makerspace is messy.  It seems that all of the materials available to the students either end up on the tables or on the floor.  However, it is the students' responsibility to clean up.  Make sure to plan 10 to 15 minutes for clean up.

7. Reserve Time for Plussing and Revision
Plussing is an opportunity for students to receive feedback about their creation.  In our classroom, we complete plussing as a whole group but other teachers do this activity in small groups.  Students bring their project to the group, and students tell the creator something that they like about the project and something that they wish the creator would improve.  It is important for students to hear the constructive criticism and use these ideas to make their project better.  After plussing, students are given 20 minutes to revise their project.  They are required to pick one idea that they received during plussing to improve their creation during revision.
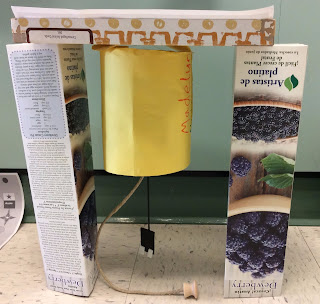
This is a rechargeable light bulb for when the electricity goes out.  Before plussing, the students held the light bulb upside down.  During revision, the students made a stand for the light bulb so that it could hang upside down on its own. 

8.  Students Will Use What You Have to Create Their Projects

When collecting items for Makerspace, I was worried about having the "right stuff" for the students to create their projects.  However, I learned that students have an idea in their head, and they will use the items around them to make their creation.  Students do not mind using the box with Amazon Prime tape across the front.  They will adapt and use what is available to them.

9. Teach Students to Only Use What They Need
Sometimes the students' eyes get too big for the task that they need to accomplish.  They will always want to pick the biggest box and the coolest design items.  However, it is important to remind students to use only what is important to their project.  I also teach students to return any pieces that they do not use so that others can use them in their project.  Makerspace is all about reusing and recycling.

10.  Makerspace Looks Different in Every Classroom
Right now, there are three first grade teachers piloting Makerspace in our school.  Makerspace looks different in all three classrooms.  Therefore, it is important to customize Makerspace for your classroom.  Jump in and see what works for you.

Thank you to Amber Dixon and Teresa Jay for going on the Makerspace journey with me.  They have spent countless hours reflecting and revising the Makerspace process with me for our classrooms.

Monday, March 27, 2017

Working Collaboratively with Google Drawings

This week the students were asked to identify a problem and create an invention to solve the problem.  The students worked collaboratively in partners to make a plan for their invention in Google Drawings.


The students worked on the same Google Drawings document.  They were excited to see how when they changed something on their screen, it also changed on their partner's screen.  This was a great way for the students to share their knowledge of using the Chromebooks with others.

A few of the groups struggled with working on the same document.  It was important for both students to agree on the same vision for their invention before they started working together on the collaborative document.  When some of the students became frustrated with their partner, we took a quick break from the project and had a conversation about respecting one another's work.

Each group was assigned a blank Google Drawings document in Google Classroom.  I had ten different groups; therefore, I had ten different assignments.  I used the differentiation feature in Google Classroom to assign partners to the same assignment.  When the Google Drawings document was attached, I choose the option for students to edit the file so that both of the students could work on the same document. 


The plan created by the students was going to be used the next day to build the invention in Makerspace.  It is amazing to see how some of the students followed the plan to build their invention.  Below are a few of the plans with the finished product.  The first invention is a snow machine (to be used in the summer of course), and the second invention is a toy for a child who does not have any toys. 


Wednesday, March 15, 2017

Collaborative Learning with Osmo on the iPad

My teaching goal this year is to increase collaboration among students by using technology.  The Osmo Gaming System is the perfect solution to help me reach this goal.  Students work in partners during math workshop and reading workstations.  The students love working together on the Osmo.


Here is the story that made me fall in love with the Osmo Gaming System.  On the day before Christmas break when half of the class had already left, I decided to test Osmo with a few of the students.  I paired up two boys to play Osmo Words.  These two boys are often rough and difficult to get along with, but there were not many students left in the classroom.  To my amazement, they started working together building words based on the picture clues, and believe it or not, they actually got along and worked well together.  In my experience with Osmo, I have found that even the most challenging students work well together because they are challenged and actively engaged.

I use three of the Osmo Gaming Systems for collaborative learning during workstation time.  During math workshop, I switch between Osmo Numbers and Osmo Coding.  For reading workstations, my students work together to practice their spelling words with Osmo Words.  Below are descriptions of each game.

Osmo Numbers asks students to combine numbers in order to reach a target number (see picture above).  There are dot tiles (up to 5) and number tiles (1-9).  Osmo Numbers is perfect for collaboration between partners because each partner has a their own set of numbers; therefore, if the students want to make 10 using a double, they both have to use their own 5 tile.

Osmo Coding is a favorite among students because it is presented like a video game.  Students use tiles to write code for Awbie, a marshmallow looking character who loves to eat strawberries.  After students create the code for Awbie to complete a task, they push play to see if their directions were correct.  If there is a mistake in the code, students have to rethink and rewrite their code which promotes problem solving.


Osmo Words is similar to hangman but with picture clues.  Each student has a set of letter tiles from A to Z.  A picture is displayed on the screen with blanks representing each letter in the word.  Students have a given number of guesses until the game is over.  What I love about Osmo Numbers is that the picture clues are not obvious.  For example, there might be a picture of an adorable puppy, but the missing word is four letters long (cute).  The students have to problem solve together to figure out the word.

It is very easy to create your own word albums on MyOsmo, and there are a lot of already pre-made word albums for you to choose from.  I create my own word albums for the students to practice their spelling words.

Some of the game sets have a lot of pieces, and the game pieces are easily lost.  I have trained my students to clean up the pieces with caution, checking the floor and desks to make sure that they have put all of the pieces away.  There have been numerous times when I have found a missing tile on the floor.

The good news is Osmo will replace missing tiles according to their website.  I have not tried to replace any tiles yet, but it gives me an added piece of mind when the students use the Osmo Gaming System in the classroom.


Friday, March 10, 2017

A Practical Application of Google Classroom

I love using Google Classroom as a platform for my students to access their assignments.  It is quick to set up and easy for students to use.  Here is an example of a lesson in which I use a digital worksheet and assign it through Google Classroom.

Our topic in math focused on the relationships between coins.  The lesson started with a YouTube video reviewing the value and relationships of different coins.  After the video, the students completed the digital worksheet below.  All components of the lesson were assigned to the students using Google Classroom.


This digital worksheet was created using Google Drawings.  On the left, the images of coins are piled up on top of one another.  The student drags the equivalent amount of coins to each box.  Below is the original worksheet in which students drew pennies, nickels, and dimes to show equivalent amounts that inspired the creation of the digital worksheet above.  


Here are the steps I used for creating the lesson in Google Classroom.  Make sure that you assign the components of the lesson in the order that you want the students to complete the activities.  

First, I assigned the YouTube video with the insert video link.  Then, I assigned the coin sorter activity from Google Drive.  Make sure to pick the option Make a copy for each student.  This will assign each student's name to a different file and allow students to work independently on their own document.  


When students have completed the assignment, they have the option to Turn It In.  This feature alerts the teacher that the student has completed their assignment, and gives the teacher access to the finished product to assign a grade if desired.  

Below is the coin sorter activity completed by a student.  A big thank you to Emily Turner for creating the digital worksheet used in this lesson.  

Saturday, February 18, 2017

Exploring Landforms with Google Street View

Today my students went swimming with turtles in the ocean, running with zebras on the plains, walking with camels in the desert, hiking with llamas in the mountains, and exploring with penguins on the polar ice caps.  My students went to all of these places in our classroom using technology on the Chromebook.


My students enjoy any type of project on the Chromebook, but they absolutely loved exploring different types of landforms with Google Street View.  The room was full of excitement as the students looked for examples of shelter, food, and clothing at different places around the world.  The students were eager to share what they found with their friends, and they made many connections on how a human's environment affects the way they live.

I created a Hyperdoc for the lesson (see below) and assigned it to the students in Google Classroom.  Each landform is numbered and labeled with a picture so that the students can easily follow along with the lesson.  Next to the landform is a link to Google Street View where the students can explore the landform in a virtual environment.  When students are done exploring, there is an empty box available for the students to respond to their virtual experience and write notes about what they encountered.  


One thing to be careful about when using Google Street View is that some links have trouble loading.  I knew this might be a problem because the page did not always load correctly when I was exploring Google Street View.  It is obvious when the page does not load correctly because there is a black screen.  Therefore, I taught the students that if the link did not load, they needed to close their tab and try again.  This required a lot of patience for the students because they were eager to explore each new landform.

If my class had access to Chromebooks everyday, I would break this lesson down into exploring one landform each day.  Sometimes all of the elements that the students were looking for (shelter, food, and clothing) were not in the given link that I assigned.  For the lesson, I would explore the assigned link for the landform together, and then give the students time to explore other destinations of the same landform in order to find more elements on how humans lives are different based on their environment.

After our virtual landform exploration, each student choose a landform and wrote about it in a collaborative Google Slide.  Check out our class eBook about landforms.  You can learn more about collaborative Google Slides here.


Thursday, February 9, 2017

Creating Books with Google Slides

Today the students created their own book in Google Slides.  Each slide was a separate page in their book.  We researched information about groundhogs all week long, and this was a great opportunity for the students to share the information they learned.


I assigned each student a Google Slide Presentation with four blank slides through Google Classroom.  I only assigned four slides because I didn't want the students to become overwhelmed, and if a student needed more pages, it was the perfect opportunity to teach them how to insert a slide into their presentation.

The students were excited to make their own book.  The first slide was the title page.  The rest of the slides contained information about what they had learned about groundhogs.

It seems that there were two type of books that emerged from this project based on the type of background the student picked.  When inserting a background into Google Slides, you have the option to pick a solid color or insert an image.  (Please note: There is a background button on the toolbar in Google Slides.  This makes inserting a background very easy for the students because it eliminates the need to right click.)


When students choose a solid color background, they had to insert more images and add more details to make the page look complete.  However, when the students inserted an image as the background, the presentation looked more professional (in my opinion) and the student only had to add the words.  Check out the two slides below.  Perhaps less is better when it comes to professional design. 


Here are the links to the completed Groundhog books: solid color background and images as background.  Overall, the students did an awesome job, and I am very proud of their work.  

Saturday, February 4, 2017

Chatting with Students on Google Slides (Using the Comment Feature)

Chatting with students is the most fun that I have had with a Chromebook project so far.  My students are working independently now, so I have the opportunity to sit back and give them feedback.  Through this activity, I really saw some of their personalities come out.

Google Slides does not really have a chat feature, but the program does allow you to comment on a student's slide, and the student can send a comment back to you.  This is a great opportunity to give positive feedback to the students as well as offer suggestions for improvement.  The students loved it when I sent them a message and were eager to reply back to me.  


The students would tell me when they sent me a message back.  Usually it would be a thank you or an ok like the picture above.  I would read these messages and move on without an reply; however, my students were disappointed when there was not a reply to their simple message.  Therefore, if Google is reading my post, I think it would be a good idea to add a like feature to the comment box so that a student's comment can be acknowledged easily.  This would make many of my students very happy.  Until then, it is best to acknowledge all of the students' messages with a simple reply or they will continue pestering you until you do.

I also liked to drop a few inside jokes in the comments for the students to enjoy (even though the students often didn't get my humor).  One of the students always used speech call-outs in her projects.  I was very surprised that she didn't use one in her project about the groundhog.  I nicely made the suggestion, and she revised her work.

Commenting with students works best with Google Slides.  Everyone is working on the same presentation, and it is easy to move back and forth between all of the students.  The commenting feature also works in Google Drawings, but it is hard to maintain because you have to open up each student's project individually.  I probably had a least 15 tabs opened at once, and my computer froze.

My next step in using the comment feature in Google Slides is to have students look at a completed presentation and give each other positive feedback through comments.  I think the students will enjoy chatting with each other, but I will have to closely monitor the conversations to make sure that they are treating each other with respect.  I will update you on how the it goes after I have the opportunity to test it out.

Sunday, January 22, 2017

Using Google Slides to Publish Student Work


I really enjoy using Google Slides with students to publish their work and make class books.  It is nice to have all of the students working on one project together, and there is only one file that contains all of the students' work.  You can also watch the students work from your computer and give students feedback as needed.  Click here to see a class book that my students made about weather.

Working in Google Slides is a lot like working in Google Drawings.  Both programs have the same toolbar and share a lot of the same features.  Google Drawings is a great program to use to train your students on the features of Google because they are working on their own individual projects.  Click here to see a previous post in which I describe the steps that I take in training my students to use Google Drawings.  Once students are proficient with Google Drawings, they are ready to work collaboratively in Google Slides.

When your students begin working on a Google Slide presentation, it is important to assign them a number so they know which slide to begin working on.  The students in my class  are already assigned class numbers, and they know they start working on the slide that corresponds to their number.  There are a few exceptions.  Number 1 and number 2 are assigned different slide numbers because there is a title page and example page at the beginning of the presentation.

The first thing that students need to do when they find their slide is to type their name on the slide immediately.  Once the student types their name, they know that they are now working on the slide with their name on it, and the slide number no longer matters.  This is important when slides are accidentally deleted and the slide numbers change.  

While students are working, it is very important for them to stay on their own slide.  This is not the time for students to be messing with other student's work and changing things on someone else's slide.  My class knows that if they are working on someone else's slide beside their own, they will loose their Chromebook privileges for the day.

I do think that when students are more advanced and mature in their knowledge of technology, there will be great advantages in students working together on the same slides and helping each other.  However, while students are still in the early stages of learning about Google Slides, I think it is best for them to stay on their own slide for now.

With that being said, there are a few ways to monitor students and catch students who are being sneaky and changing things on someone else's slide.  I suggest teaching your students these collaborative features of Google so that they are aware if someone else is working on their slide, and they can help you monitor students who might be off task.

At the top of Google Slides, you can see who is working in the presentation.  If you click on a person's icon, it will immediately take you to where the person is working in the presentation.  This is a quick way to monitor if a person is working in the right place.

You can also move your mouse over the slides on the left side of the screen.  The slide will show who is currently working on that slide.  If there is only supposed to be one person working on each slide, then there should only be one icon on each slide.
The students really enjoy working together in Google Slides.  They also enjoy reading the other students' pages.  I usually print out the slides and put them in a binder for students to read in the classroom.  You can also assign the finished presentation as view only in Google Classroom if you want the students to view the presentation electronically without being able to change any of the presentation.  

I would love to see what you are doing in your classroom.  Please share any projects that you have created with your students using Google Slides. 

Sunday, January 1, 2017

Creating a Project with Google Drawings

Google Drawings is my favorite program to use for students to create projects because the possibilities are endless.  Basically anything that you create with a blank sheet of paper, can be created using Google Drawings.  Here are the steps that I give students when creating a project with Google Drawings:


These directions do not happen overnight.  I teach each direction as a different project until the students become more familiar with the program.  The idea behind teaching with technology is not to invent new lessons, but to incorporate technology into lessons that you are already teaching.  Remember, add a little at a time and build on the last piece of technology taught.

I introduce Google Drawings with a blank graphic organizer like this one.  This is a great opportunity to teach the students to double click on the shapes and practice typing.  I even teach students how to change the font and font color when they are ready.

Next, I teach students how to insert an image.  I use a lesson about schema in which students insert images to show their interests.  Inserting an image is easy in Google Drawings because you can search for images within the program.  When inserting images, it is important for students to spell the words correctly during their image search.

On another project, I focus my lesson on inserting shapes and typing sentences.  Google is flexible and allows you to type directly into a shape.  Here is an example of a student project when the class was working on adding text.

The last step is to teach the students how to add a background.  There are two ways in which students can add a background.  To add a single color background, right click anywhere on the page.  On the right click menu, choose the background option.  From there, a variety of solid colors will be available.  When you choose a color, the color will cover the entire canvas.

Students can also insert any image and enlarge the image to fit the whole page as a background.  This is a great way for students to illustrate the setting of a story.  I tell students to do this step first because of layering.  When students insert the background last, they panic because the background covers up all of their work.  Of course this can be fixed by sending the image to the back, but the whole catastrophe can be avoided if the students insert the background first.    

Remember, when you teach lessons with technology, you add technology into lessons that you are already teaching.  I take paper projects that the students have completed in previous years, and restructure the same projects utilizing Google Drawings.  What are some projects that your students can create using Google Drawings?

Friday, December 30, 2016

Merry Christmas and Happy New Year!

One of our parent gifts this year was for the students to write a note to their parents saying thank you.  The students made an outline in their Writer's Notebook and completed the final project in Google Drawings.  I think their projects turned out amazing.  I hope the parents appreciate the hard work their children put into creating their gifts.  Merry Christmas and Happy New Year!


Saturday, December 3, 2016

Collaborative Writing Using Google Drawings

Do you remember doing Round Robin Writing in school?  The student starts writing a story.  A bell goes off and the student moves to another desk, reads that student's story, and adds to the student's writing.  The bell goes off again, and the student moves to another desk.  This continues until the teacher thinks it is time for the students to stop and return to their desks.  When the students return to their desk, they read their story that has now been added to by many other students and add a conclusion to the story.

I decided to try this same concept with Google Drawings on the Chromebooks.  The students were told to pick a background for their story.  They could add details to their project with images.  Then the students needed to start writing a story.  Each project was supposed to have a place where students could write their name when they contributed to the project.  

The students were excited to start their stories.  After about 10 minutes, I told the students that it was time to switch to another computer.  Most of the students were not ready to switch (some students take longer than others when using technology), so I changed my directions.  I told students to stand up when they were ready to switch, and I facilitated which computer each student should work on.

The students were eager to work on each other projects.  When the student started on another student's project, they were told to read the story first, and then they were allowed to add more images or more to the writing.  Reading the story first was an important step in the process because the students needed a lot of reminders to make sure what they added to the project matched the project.  For example, one student liked to add kittens to all of the projects she was working on, but this didn't work when the background for the project was a football field with football players.

Some students did not like the other students adding to their work, and I had to assure them that they would be able to return their computer in the end to edit their work.  One rule I did make was that you were not allowed to delete anything that anyone else added to the project.  Students were allowed to move things around, change the color, and add more images, but they could not delete anything.  

Overall, the project was a positive learning experience for the students.  When it was time for the activity to end, the students were excited to go back and see who worked on their project and what was added.  Students were also given the opportunity to put the finishing touches on their project before they turned it in.  Below is a project that three of the students completed together.

My name is Duck.  I am at school right now.  This is my friend named Bird.  I like my friend bird.

One of my goals this year is to increase collaboration among students by using technology.  This is my first project to include collaboration with the Chromebooks.  I will share more projects utilizing technology to increase collaboration as the school year progresses.

Tuesday, November 22, 2016

Reading Response with ChatterPix Kids

Reading response is an important tool in Reading Workshop to monitor comprehension.  It is important for students to talk about books so they can better understand what they are reading.  Here are a few examples of different reading responses:

This book is about...
I like this book because...
My favorite part was _____ because...
My favorite character was _____ because...
_____ feels _____ because...
I learned...

My favorite app on the iPad to use for reading response is ChatterPix Kids.  ChatterPix Kids is very kid friendly and easy for students to use.  It allows students to practice responding about the book orally.  This is a great opportunity for our auditory learners to shine.

ChatterPix Kids
Students simply take a picture, draw a mouth, and record their ideas.  Students can also add borders and images to decorate their creation.  When they are finished, they can download their project directly to the iPad.

ChatterPix Kids can be used for reading response in different ways.  The student can take a picture of the front of the book and make the book talk.  This is great when responding "I like this book because" or "This book is about".


Students can also focus their projects on certain characters or events by taking a picture of a page in the book.  These reading responses can focus on how the character is feeling or explain different parts of the story.


ChatterPix Kids is fun and easy for the students to use.  I introduce the app whole group to the class.  This can create a loud classroom because everyone is talking at one time.  I discuss with the students how they need to try to pick a time when the classroom is quiet to record their voice and always listen to their recording to make sure that they can understand what they are saying.

Once the students can use the app independently, I use 5 iPads in the classroom for when students are doing Read to Self.  Students pick a book from their book box and complete an assigned reading response or a reading response of their choice.  When they are finished, I ask the students to keep their iPad with them but continue to read their books to themselves.  When we are finished with the rotation, I ask students to share their project with the class.

Monday, November 21, 2016

Adding a Background in Google Drawings

Happy Thanksgiving!  This week our class read the book Run, Turkey, Run! by Diane Mayr.  After reading the book, I taught the students how to write a super sentence.  We start with the sentence: The turkey ran.  After we discuss how boring this sentence is to the reader, we add more details to the sentence to make the sentence more exciting.


Once the students have written their super sentence, it is time to publish their work.  In the past, we have made a turkey out of construction paper and displayed the writing in the hallway.  However, I thought this would be the perfect opportunity to teach the students how to insert a background into Google Drawings because each sentence contained a setting.  The purpose of using technology in the classroom is not to invent new lessons but insert technology into lessons that you are already teaching.

I love adding backgrounds to Google Drawings because it adds a lot of visual appeal to student projects.  The background is simply a regular image that is enlarged to fit the entire page.  Therefore, any image can be used as a background.

When inserting a background, always insert the picture first.  This is also a good time to teach students about the undo button.  There will be many times when the student will accidentally move their background, and the students quickly learn that the undo button is their friend.

The cool fat turkey ran to the trees to hid in the trees at 12 o'clock.


The students were told to insert a background that went with their setting, insert an image of a turkey that looked like their adjective, and write their super sentence.  One of my favorite features of Google Drawings is the ability to insert pictures right into the project without even leaving the program.  When the student searches for their image, there are a lot of images available.  This gives the students a lot of choice when picking the image that works best for their project.

Sunday, November 13, 2016

Reading Response with Google Forms

This week we are reading books based on the characters Elephant and Piggie by Mo Willems. The students absolutely love these books, and they are great for teaching students various reading skills.

The students are working on improving their reading comprehension by retelling the story when they finish reading a book.  Our activity on the Chromebook was for the students to type a reading response after watching a YouTube video of the book Should I Share My Ice Cream? by Mo Willems. The reading response was created by using Google Forms and shared with the students through Google Classroom.


The YouTube video was added to the Google Form so that it was easily accessible to the students. The first question was for the student to type their first and last name so that I could identify who was filling out the form.  The second question asked the student to retell the story.  I choose paragraph for this question type so that students would have enough room to write their answers.

Once the student hit submit, their answers were sent to me.  Through Google Forms, you have the option to see each individual form that is submitted or display all of the answers easily with a Google Sheet.  The teacher can also give feedback to each individual answer and assign a score to the form. 


Overall, Google Forms was very easy for the students to use.  The one problem was the size of the video.  When the students played the video in Google Forms, it was very small, and it would not let the students enlarge the video.  The students had to click the YouTube button and watch the video on the YouTube website.  This gave the students access to other videos.  Most students closed the tab when the video was finished and completed their assignment in Google Forms.  However, a few mischievous students decided to watch other YouTube videos.  These students were quickly redirected back to the assignment, and if the off task behavior continued, they were give a piece of paper and pencil to complete the assignment.  

Download a copy of the form here.

UPDATE:  Thank you @RichesonEmily for your feedback.  You can enlarge the size of the video in Google Forms the same way you enlarge an image (pulling the blue boxes in the corner).  Emily also suggested using SafeShare.tv to prevent students from venturing from the designated video; however, you will have to use SafeShare as a link in Google Forms because it cannot be embedded as a video.  Great ideas!


Friday, November 11, 2016

Collaborative Problem Solving Using Digital Manipulatives on the Chromebook

In math, students are working on writing their own math problems.  Sometimes, the students struggle with coming up with ideas.  To help the students generate ideas, we used digital manipulatives with partners to practice the process of creating word problems.  Students were asked to create a math problem and model the problem on the screen.  Their partner was to say the answer and tell the number sentence that they used to solve the problem.  Partners shared one Chromebook to complete this activity.


The digital manipulatives that we used were from McGraw-Hill Education.  We began the lesson with students using the playground as their background and modeling their problems with bears.  Once students were comfortable using the program, they were allowed to pick their own background and manipulatives.  The baseball field was a popular choice for the boys.


There are two important buttons on the toolbar that the students need to use.  The most important button is for the students to clear objects.  For some reason, the students always try to cover the screen with as many bears as possible.  Instead of removing the bears one by one, the bears can be removed with one quick button.  The other important button is to remove the background.


Students enjoyed exploring the different options that the program had to offer.  One group even set the timer for each other when it was time to solve the problem.

Reflection
I should have modeled my expectations for creating word problems more for the students because there was a lot of off task behavior.  The students were playing with the digital manipulatives more than creating word problems.

About halfway through the project, I stopped the students and changed the directions.  I told the students that one student should have the Chromebook to themselves while they were designing the problem.  When they were finished setting the problem up, they should return to their partner and explain their problem to them.  This allowed the student to focus more on creating the problem and less time playing with their friend; however, the other student became bored while they were waiting for their partner to create the word problem.

Next time, I will allow both students to have their own Chromebook.  Each student can create a problem of their own with their own background and digital manipulatives.  When both students are finished creating, they can share their word problem with one another.

Sunday, November 6, 2016

Halloween Writing with the Chromebook

Our project this week was to put everything we had learned so far about Google Drawings into one activity.  The student was to insert their picture from a shared folder, insert a relevant picture, and write about their picture.  As always, the students had the freedom to pick their own fonts and colors.  Happy Halloween!

I am Ray.  What are you going to be for Halloween night?  Ray is brave.  She helps people when they are hurt.

For directions on how to set up the project for students to insert their own individual pictures from a shared folder, please click here.  To learn more about teaching students how to insert a picture into Google Drawings, please click here.

I would love to see what your class is doing with the Chromebooks.  Please comment and share the projects that your class is creating with technology.