Sunday, January 22, 2017

Using Google Slides to Publish Student Work


I really enjoy using Google Slides with students to publish their work and make class books.  It is nice to have all of the students working on one project together, and there is only one file that contains all of the students' work.  You can also watch the students work from your computer and give students feedback as needed.  Click here to see a class book that my students made about weather.

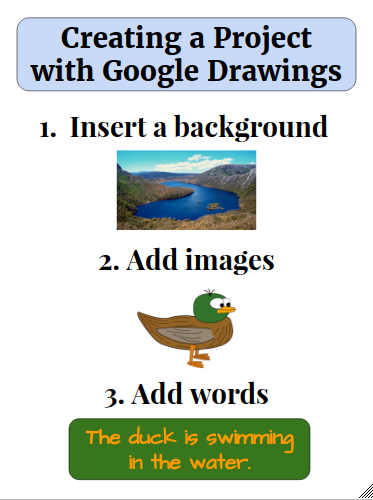
Working in Google Slides is a lot like working in Google Drawings.  Both programs have the same toolbar and share a lot of the same features.  Google Drawings is a great program to use to train your students on the features of Google because they are working on their own individual projects.  Click here to see a previous post in which I describe the steps that I take in training my students to use Google Drawings.  Once students are proficient with Google Drawings, they are ready to work collaboratively in Google Slides.

When your students begin working on a Google Slide presentation, it is important to assign them a number so they know which slide to begin working on.  The students in my class  are already assigned class numbers, and they know they start working on the slide that corresponds to their number.  There are a few exceptions.  Number 1 and number 2 are assigned different slide numbers because there is a title page and example page at the beginning of the presentation.

The first thing that students need to do when they find their slide is to type their name on the slide immediately.  Once the student types their name, they know that they are now working on the slide with their name on it, and the slide number no longer matters.  This is important when slides are accidentally deleted and the slide numbers change.  

While students are working, it is very important for them to stay on their own slide.  This is not the time for students to be messing with other student's work and changing things on someone else's slide.  My class knows that if they are working on someone else's slide beside their own, they will loose their Chromebook privileges for the day.

I do think that when students are more advanced and mature in their knowledge of technology, there will be great advantages in students working together on the same slides and helping each other.  However, while students are still in the early stages of learning about Google Slides, I think it is best for them to stay on their own slide for now.

With that being said, there are a few ways to monitor students and catch students who are being sneaky and changing things on someone else's slide.  I suggest teaching your students these collaborative features of Google so that they are aware if someone else is working on their slide, and they can help you monitor students who might be off task.

At the top of Google Slides, you can see who is working in the presentation.  If you click on a person's icon, it will immediately take you to where the person is working in the presentation.  This is a quick way to monitor if a person is working in the right place.

You can also move your mouse over the slides on the left side of the screen.  The slide will show who is currently working on that slide.  If there is only supposed to be one person working on each slide, then there should only be one icon on each slide.
The students really enjoy working together in Google Slides.  They also enjoy reading the other students' pages.  I usually print out the slides and put them in a binder for students to read in the classroom.  You can also assign the finished presentation as view only in Google Classroom if you want the students to view the presentation electronically without being able to change any of the presentation.  

I would love to see what you are doing in your classroom.  Please share any projects that you have created with your students using Google Slides. 

Sunday, January 15, 2017

Lessons Learned from a Collaborative Google Slide Project

When I started this blog, I promised to share the good things that happen when teaching with technology as well as the bad.  Here is a chance for me to share a lesson that went horribly wrong.  Luckily, my mistakes will help you teach your collaborative learning lessons better.

Last week, we completed our first collaborative Google Slide Presentation making a class book entitled Snowman Building.  Each student created a snowman and wrote at least 3 sentences about their snowman.  The students started with a slide that looked like this:


The Google Slide Presentation was assigned using Google Classroom.  This time, instead of making a copy of the presentation for each student, each student was allowed to edit the same presentation.  Therefore, all of the students were working on one Google Slide Presentation at the same time.

The students in my classroom are assigned numbers.  I told the students to work on the slide that corresponded with their number.  The only exception to this rule were numbers 1 and 2.  I assigned these students numbers at the end of the presentation because slide one was the title page and slide two was the page that I used to model the project.

Once everyone had found their slide, they were allowed to move the different shapes around to build their snowman.  The students were given strict instructions to only work on their slide.  Once their snowman was built, the students were supposed to delete the snowman parts they did not use.  This is where the problems started.

If a student did not select an item correctly when they were deleting the snowman parts, they would delete the entire slide.  This would cause a panic in the classroom because not only did a student loose their work but all of the slide numbers changed; therefore, some of the students were no longer working on the slide number that they were assigned.  The deleted slide can be easily fixed with an undo as long as you can figure out who deleted the slide.  However, once a slide is deleted, it is best to have all students stop working until you can fix the problem.

The instructional technologist on my campus completed this same project with another first grade teacher's class.  Her solution for recovering a deleted slide was to have all of the students stop and press undo (control + z).  The missing slide would reappear, and it saved her from having to find the student who deleted the slide.  Thanks @RichesonEmily for this quick tip.

Another thing I would do differently to help ease student panic when a slide is deleted is for each student to type their name on their slide as soon as they start working.  With their name on the slide, the student is no longer depending on the slide number to identify their slide.  I would only use the slide number as a tool to help each student know which slide to begin working on.

Another problem that arose was a mischievous student who thought it would be funny to change another student's work.  At first, I heard some students complaining that things were happening on their slide that they did not do.  It is hard to catch a student who is being sneaky by just walking around the room.  Luckily, Google has built in ways in which you can see where other collaborators in the document are working and what they are doing.  Here are some tips on how to monitor your students in Google Slides:

1.  At the top of each page, there is a list of who is working in the presentation.  When you select a collaborator, it takes you to the place in the document where the person is working.  Therefore, you can quickly see if the student is working in the right place.


2.  You can also move your mouse over the slides to see who is working on what slide.  In the image below, you can quickly see that Student H is working on slide 5.  It sticks out like a sore thumb if more than one student is working on the same slide.


Even though this lesson caused a lot of frustration for me, it still turned out to be a very positive lesson.  Not only did the students learn something new, but I also learned a lot of things about working collaboratively on the same Google Slide Presentation together.  I hope you can benefit from my mistakes.  Here is a finished slide completed by a student:


Click here to see the completed class book.

*I would like to give credit to whoever created the original snowman presentation, but I cannot find the source on the internet.  I will continue to look and update this post when I find it.*

Sunday, January 1, 2017

Creating a Project with Google Drawings

Google Drawings is my favorite program to use for students to create projects because the possibilities are endless.  Basically anything that you create with a blank sheet of paper, can be created using Google Drawings.  Here are the steps that I give students when creating a project with Google Drawings:


These directions do not happen overnight.  I teach each direction as a different project until the students become more familiar with the program.  The idea behind teaching with technology is not to invent new lessons, but to incorporate technology into lessons that you are already teaching.  Remember, add a little at a time and build on the last piece of technology taught.

I introduce Google Drawings with a blank graphic organizer like this one.  This is a great opportunity to teach the students to double click on the shapes and practice typing.  I even teach students how to change the font and font color when they are ready.

Next, I teach students how to insert an image.  I use a lesson about schema in which students insert images to show their interests.  Inserting an image is easy in Google Drawings because you can search for images within the program.  When inserting images, it is important for students to spell the words correctly during their image search.

On another project, I focus my lesson on inserting shapes and typing sentences.  Google is flexible and allows you to type directly into a shape.  Here is an example of a student project when the class was working on adding text.

The last step is to teach the students how to add a background.  There are two ways in which students can add a background.  To add a single color background, right click anywhere on the page.  On the right click menu, choose the background option.  From there, a variety of solid colors will be available.  When you choose a color, the color will cover the entire canvas.

Students can also insert any image and enlarge the image to fit the whole page as a background.  This is a great way for students to illustrate the setting of a story.  I tell students to do this step first because of layering.  When students insert the background last, they panic because the background covers up all of their work.  Of course this can be fixed by sending the image to the back, but the whole catastrophe can be avoided if the students insert the background first.    

Remember, when you teach lessons with technology, you add technology into lessons that you are already teaching.  I take paper projects that the students have completed in previous years, and restructure the same projects utilizing Google Drawings.  What are some projects that your students can create using Google Drawings?