Monday, March 27, 2017

Working Collaboratively with Google Drawings

This week the students were asked to identify a problem and create an invention to solve the problem.  The students worked collaboratively in partners to make a plan for their invention in Google Drawings.


The students worked on the same Google Drawings document.  They were excited to see how when they changed something on their screen, it also changed on their partner's screen.  This was a great way for the students to share their knowledge of using the Chromebooks with others.

A few of the groups struggled with working on the same document.  It was important for both students to agree on the same vision for their invention before they started working together on the collaborative document.  When some of the students became frustrated with their partner, we took a quick break from the project and had a conversation about respecting one another's work.

Each group was assigned a blank Google Drawings document in Google Classroom.  I had ten different groups; therefore, I had ten different assignments.  I used the differentiation feature in Google Classroom to assign partners to the same assignment.  When the Google Drawings document was attached, I choose the option for students to edit the file so that both of the students could work on the same document. 


The plan created by the students was going to be used the next day to build the invention in Makerspace.  It is amazing to see how some of the students followed the plan to build their invention.  Below are a few of the plans with the finished product.  The first invention is a snow machine (to be used in the summer of course), and the second invention is a toy for a child who does not have any toys. 


Wednesday, March 15, 2017

Collaborative Learning with Osmo on the iPad

My teaching goal this year is to increase collaboration among students by using technology.  The Osmo Gaming System is the perfect solution to help me reach this goal.  Students work in partners during math workshop and reading workstations.  The students love working together on the Osmo.


Here is the story that made me fall in love with the Osmo Gaming System.  On the day before Christmas break when half of the class had already left, I decided to test Osmo with a few of the students.  I paired up two boys to play Osmo Words.  These two boys are often rough and difficult to get along with, but there were not many students left in the classroom.  To my amazement, they started working together building words based on the picture clues, and believe it or not, they actually got along and worked well together.  In my experience with Osmo, I have found that even the most challenging students work well together because they are challenged and actively engaged.

I use three of the Osmo Gaming Systems for collaborative learning during workstation time.  During math workshop, I switch between Osmo Numbers and Osmo Coding.  For reading workstations, my students work together to practice their spelling words with Osmo Words.  Below are descriptions of each game.

Osmo Numbers asks students to combine numbers in order to reach a target number (see picture above).  There are dot tiles (up to 5) and number tiles (1-9).  Osmo Numbers is perfect for collaboration between partners because each partner has a their own set of numbers; therefore, if the students want to make 10 using a double, they both have to use their own 5 tile.

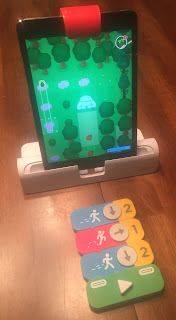
Osmo Coding is a favorite among students because it is presented like a video game.  Students use tiles to write code for Awbie, a marshmallow looking character who loves to eat strawberries.  After students create the code for Awbie to complete a task, they push play to see if their directions were correct.  If there is a mistake in the code, students have to rethink and rewrite their code which promotes problem solving.


Osmo Words is similar to hangman but with picture clues.  Each student has a set of letter tiles from A to Z.  A picture is displayed on the screen with blanks representing each letter in the word.  Students have a given number of guesses until the game is over.  What I love about Osmo Numbers is that the picture clues are not obvious.  For example, there might be a picture of an adorable puppy, but the missing word is four letters long (cute).  The students have to problem solve together to figure out the word.

It is very easy to create your own word albums on MyOsmo, and there are a lot of already pre-made word albums for you to choose from.  I create my own word albums for the students to practice their spelling words.

Some of the game sets have a lot of pieces, and the game pieces are easily lost.  I have trained my students to clean up the pieces with caution, checking the floor and desks to make sure that they have put all of the pieces away.  There have been numerous times when I have found a missing tile on the floor.

The good news is Osmo will replace missing tiles according to their website.  I have not tried to replace any tiles yet, but it gives me an added piece of mind when the students use the Osmo Gaming System in the classroom.


Friday, March 10, 2017

A Practical Application of Google Classroom

I love using Google Classroom as a platform for my students to access their assignments.  It is quick to set up and easy for students to use.  Here is an example of a lesson in which I use a digital worksheet and assign it through Google Classroom.

Our topic in math focused on the relationships between coins.  The lesson started with a YouTube video reviewing the value and relationships of different coins.  After the video, the students completed the digital worksheet below.  All components of the lesson were assigned to the students using Google Classroom.


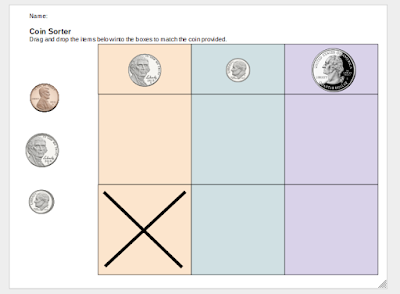
This digital worksheet was created using Google Drawings.  On the left, the images of coins are piled up on top of one another.  The student drags the equivalent amount of coins to each box.  Below is the original worksheet in which students drew pennies, nickels, and dimes to show equivalent amounts that inspired the creation of the digital worksheet above.  


Here are the steps I used for creating the lesson in Google Classroom.  Make sure that you assign the components of the lesson in the order that you want the students to complete the activities.  

First, I assigned the YouTube video with the insert video link.  Then, I assigned the coin sorter activity from Google Drive.  Make sure to pick the option Make a copy for each student.  This will assign each student's name to a different file and allow students to work independently on their own document.  


When students have completed the assignment, they have the option to Turn It In.  This feature alerts the teacher that the student has completed their assignment, and gives the teacher access to the finished product to assign a grade if desired.  

Below is the coin sorter activity completed by a student.  A big thank you to Emily Turner for creating the digital worksheet used in this lesson.