
Friday, December 30, 2016
Merry Christmas and Happy New Year!
One of our parent gifts this year was for the students to write a note to their parents saying thank you. The students made an outline in their Writer's Notebook and completed the final project in Google Drawings. I think their projects turned out amazing. I hope the parents appreciate the hard work their children put into creating their gifts. Merry Christmas and Happy New Year!

Saturday, December 3, 2016
Collaborative Writing Using Google Drawings
Do you remember doing Round Robin Writing in school? The student starts writing a story. A bell goes off and the student moves to another desk, reads that student's story, and adds to the student's writing. The bell goes off again, and the student moves to another desk. This continues until the teacher thinks it is time for the students to stop and return to their desks. When the students return to their desk, they read their story that has now been added to by many other students and add a conclusion to the story.
I decided to try this same concept with Google Drawings on the Chromebooks. The students were told to pick a background for their story. They could add details to their project with images. Then the students needed to start writing a story. Each project was supposed to have a place where students could write their name when they contributed to the project.
The students were excited to start their stories. After about 10 minutes, I told the students that it was time to switch to another computer. Most of the students were not ready to switch (some students take longer than others when using technology), so I changed my directions. I told students to stand up when they were ready to switch, and I facilitated which computer each student should work on.
The students were eager to work on each other projects. When the student started on another student's project, they were told to read the story first, and then they were allowed to add more images or more to the writing. Reading the story first was an important step in the process because the students needed a lot of reminders to make sure what they added to the project matched the project. For example, one student liked to add kittens to all of the projects she was working on, but this didn't work when the background for the project was a football field with football players.
Some students did not like the other students adding to their work, and I had to assure them that they would be able to return their computer in the end to edit their work. One rule I did make was that you were not allowed to delete anything that anyone else added to the project. Students were allowed to move things around, change the color, and add more images, but they could not delete anything.
Overall, the project was a positive learning experience for the students. When it was time for the activity to end, the students were excited to go back and see who worked on their project and what was added. Students were also given the opportunity to put the finishing touches on their project before they turned it in. Below is a project that three of the students completed together.
One of my goals this year is to increase collaboration among students by using technology. This is my first project to include collaboration with the Chromebooks. I will share more projects utilizing technology to increase collaboration as the school year progresses.
I decided to try this same concept with Google Drawings on the Chromebooks. The students were told to pick a background for their story. They could add details to their project with images. Then the students needed to start writing a story. Each project was supposed to have a place where students could write their name when they contributed to the project.
The students were excited to start their stories. After about 10 minutes, I told the students that it was time to switch to another computer. Most of the students were not ready to switch (some students take longer than others when using technology), so I changed my directions. I told students to stand up when they were ready to switch, and I facilitated which computer each student should work on.
The students were eager to work on each other projects. When the student started on another student's project, they were told to read the story first, and then they were allowed to add more images or more to the writing. Reading the story first was an important step in the process because the students needed a lot of reminders to make sure what they added to the project matched the project. For example, one student liked to add kittens to all of the projects she was working on, but this didn't work when the background for the project was a football field with football players.
Some students did not like the other students adding to their work, and I had to assure them that they would be able to return their computer in the end to edit their work. One rule I did make was that you were not allowed to delete anything that anyone else added to the project. Students were allowed to move things around, change the color, and add more images, but they could not delete anything.
Overall, the project was a positive learning experience for the students. When it was time for the activity to end, the students were excited to go back and see who worked on their project and what was added. Students were also given the opportunity to put the finishing touches on their project before they turned it in. Below is a project that three of the students completed together.
 |
| My name is Duck. I am at school right now. This is my friend named Bird. I like my friend bird. |
One of my goals this year is to increase collaboration among students by using technology. This is my first project to include collaboration with the Chromebooks. I will share more projects utilizing technology to increase collaboration as the school year progresses.
Tuesday, November 22, 2016
Reading Response with ChatterPix Kids
Reading response is an important tool in Reading Workshop to monitor comprehension. It is important for students to talk about books so they can better understand what they are reading. Here are a few examples of different reading responses:
My favorite app on the iPad to use for reading response is ChatterPix Kids. ChatterPix Kids is very kid friendly and easy for students to use. It allows students to practice responding about the book orally. This is a great opportunity for our auditory learners to shine.
Students simply take a picture, draw a mouth, and record their ideas. Students can also add borders and images to decorate their creation. When they are finished, they can download their project directly to the iPad.
ChatterPix Kids can be used for reading response in different ways. The student can take a picture of the front of the book and make the book talk. This is great when responding "I like this book because" or "This book is about".
Students can also focus their projects on certain characters or events by taking a picture of a page in the book. These reading responses can focus on how the character is feeling or explain different parts of the story.
ChatterPix Kids is fun and easy for the students to use. I introduce the app whole group to the class. This can create a loud classroom because everyone is talking at one time. I discuss with the students how they need to try to pick a time when the classroom is quiet to record their voice and always listen to their recording to make sure that they can understand what they are saying.
Once the students can use the app independently, I use 5 iPads in the classroom for when students are doing Read to Self. Students pick a book from their book box and complete an assigned reading response or a reading response of their choice. When they are finished, I ask the students to keep their iPad with them but continue to read their books to themselves. When we are finished with the rotation, I ask students to share their project with the class.
This book is about...
I like this book because...
My favorite part was _____ because...
My favorite character was _____ because...
_____ feels _____ because...
I learned...
My favorite app on the iPad to use for reading response is ChatterPix Kids. ChatterPix Kids is very kid friendly and easy for students to use. It allows students to practice responding about the book orally. This is a great opportunity for our auditory learners to shine.
 |
| ChatterPix Kids |
Students can also focus their projects on certain characters or events by taking a picture of a page in the book. These reading responses can focus on how the character is feeling or explain different parts of the story.
ChatterPix Kids is fun and easy for the students to use. I introduce the app whole group to the class. This can create a loud classroom because everyone is talking at one time. I discuss with the students how they need to try to pick a time when the classroom is quiet to record their voice and always listen to their recording to make sure that they can understand what they are saying.
Once the students can use the app independently, I use 5 iPads in the classroom for when students are doing Read to Self. Students pick a book from their book box and complete an assigned reading response or a reading response of their choice. When they are finished, I ask the students to keep their iPad with them but continue to read their books to themselves. When we are finished with the rotation, I ask students to share their project with the class.
Monday, November 21, 2016
Adding a Background in Google Drawings
Happy Thanksgiving! This week our class read the book Run, Turkey, Run! by Diane Mayr. After reading the book, I taught the students how to write a super sentence. We start with the sentence: The turkey ran. After we discuss how boring this sentence is to the reader, we add more details to the sentence to make the sentence more exciting.

Once the students have written their super sentence, it is time to publish their work. In the past, we have made a turkey out of construction paper and displayed the writing in the hallway. However, I thought this would be the perfect opportunity to teach the students how to insert a background into Google Drawings because each sentence contained a setting. The purpose of using technology in the classroom is not to invent new lessons but insert technology into lessons that you are already teaching.
I love adding backgrounds to Google Drawings because it adds a lot of visual appeal to student projects. The background is simply a regular image that is enlarged to fit the entire page. Therefore, any image can be used as a background.
When inserting a background, always insert the picture first. This is also a good time to teach students about the undo button. There will be many times when the student will accidentally move their background, and the students quickly learn that the undo button is their friend.
The students were told to insert a background that went with their setting, insert an image of a turkey that looked like their adjective, and write their super sentence. One of my favorite features of Google Drawings is the ability to insert pictures right into the project without even leaving the program. When the student searches for their image, there are a lot of images available. This gives the students a lot of choice when picking the image that works best for their project.

Once the students have written their super sentence, it is time to publish their work. In the past, we have made a turkey out of construction paper and displayed the writing in the hallway. However, I thought this would be the perfect opportunity to teach the students how to insert a background into Google Drawings because each sentence contained a setting. The purpose of using technology in the classroom is not to invent new lessons but insert technology into lessons that you are already teaching.
I love adding backgrounds to Google Drawings because it adds a lot of visual appeal to student projects. The background is simply a regular image that is enlarged to fit the entire page. Therefore, any image can be used as a background.
When inserting a background, always insert the picture first. This is also a good time to teach students about the undo button. There will be many times when the student will accidentally move their background, and the students quickly learn that the undo button is their friend.
 |
| The cool fat turkey ran to the trees to hid in the trees at 12 o'clock. |
The students were told to insert a background that went with their setting, insert an image of a turkey that looked like their adjective, and write their super sentence. One of my favorite features of Google Drawings is the ability to insert pictures right into the project without even leaving the program. When the student searches for their image, there are a lot of images available. This gives the students a lot of choice when picking the image that works best for their project.
Sunday, November 13, 2016
Reading Response with Google Forms
This week we are reading books based on the characters Elephant and Piggie by Mo Willems. The students absolutely love these books, and they are great for teaching students various reading skills.
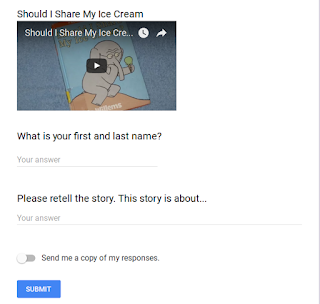

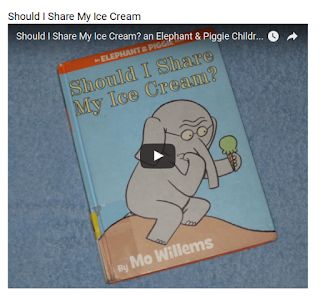
The students are working on improving their reading comprehension by retelling the story when they finish reading a book. Our activity on the Chromebook was for the students to type a reading response after watching a YouTube video of the book Should I Share My Ice Cream? by Mo Willems. The reading response was created by using Google Forms and shared with the students through Google Classroom.

The YouTube video was added to the Google Form so that it was easily accessible to the students. The first question was for the student to type their first and last name so that I could identify who was filling out the form. The second question asked the student to retell the story. I choose paragraph for this question type so that students would have enough room to write their answers.
Once the student hit submit, their answers were sent to me. Through Google Forms, you have the option to see each individual form that is submitted or display all of the answers easily with a Google Sheet. The teacher can also give feedback to each individual answer and assign a score to the form.

Overall, Google Forms was very easy for the students to use. The one problem was the size of the video. When the students played the video in Google Forms, it was very small, and it would not let the students enlarge the video. The students had to click the YouTube button and watch the video on the YouTube website. This gave the students access to other videos. Most students closed the tab when the video was finished and completed their assignment in Google Forms. However, a few mischievous students decided to watch other YouTube videos. These students were quickly redirected back to the assignment, and if the off task behavior continued, they were give a piece of paper and pencil to complete the assignment.
Download a copy of the form here.
UPDATE: Thank you @RichesonEmily for your feedback. You can enlarge the size of the video in Google Forms the same way you enlarge an image (pulling the blue boxes in the corner). Emily also suggested using SafeShare.tv to prevent students from venturing from the designated video; however, you will have to use SafeShare as a link in Google Forms because it cannot be embedded as a video. Great ideas!

Friday, November 11, 2016
Collaborative Problem Solving Using Digital Manipulatives on the Chromebook
In math, students are working on writing their own math problems. Sometimes, the students struggle with coming up with ideas. To help the students generate ideas, we used digital manipulatives with partners to practice the process of creating word problems. Students were asked to create a math problem and model the problem on the screen. Their partner was to say the answer and tell the number sentence that they used to solve the problem. Partners shared one Chromebook to complete this activity.
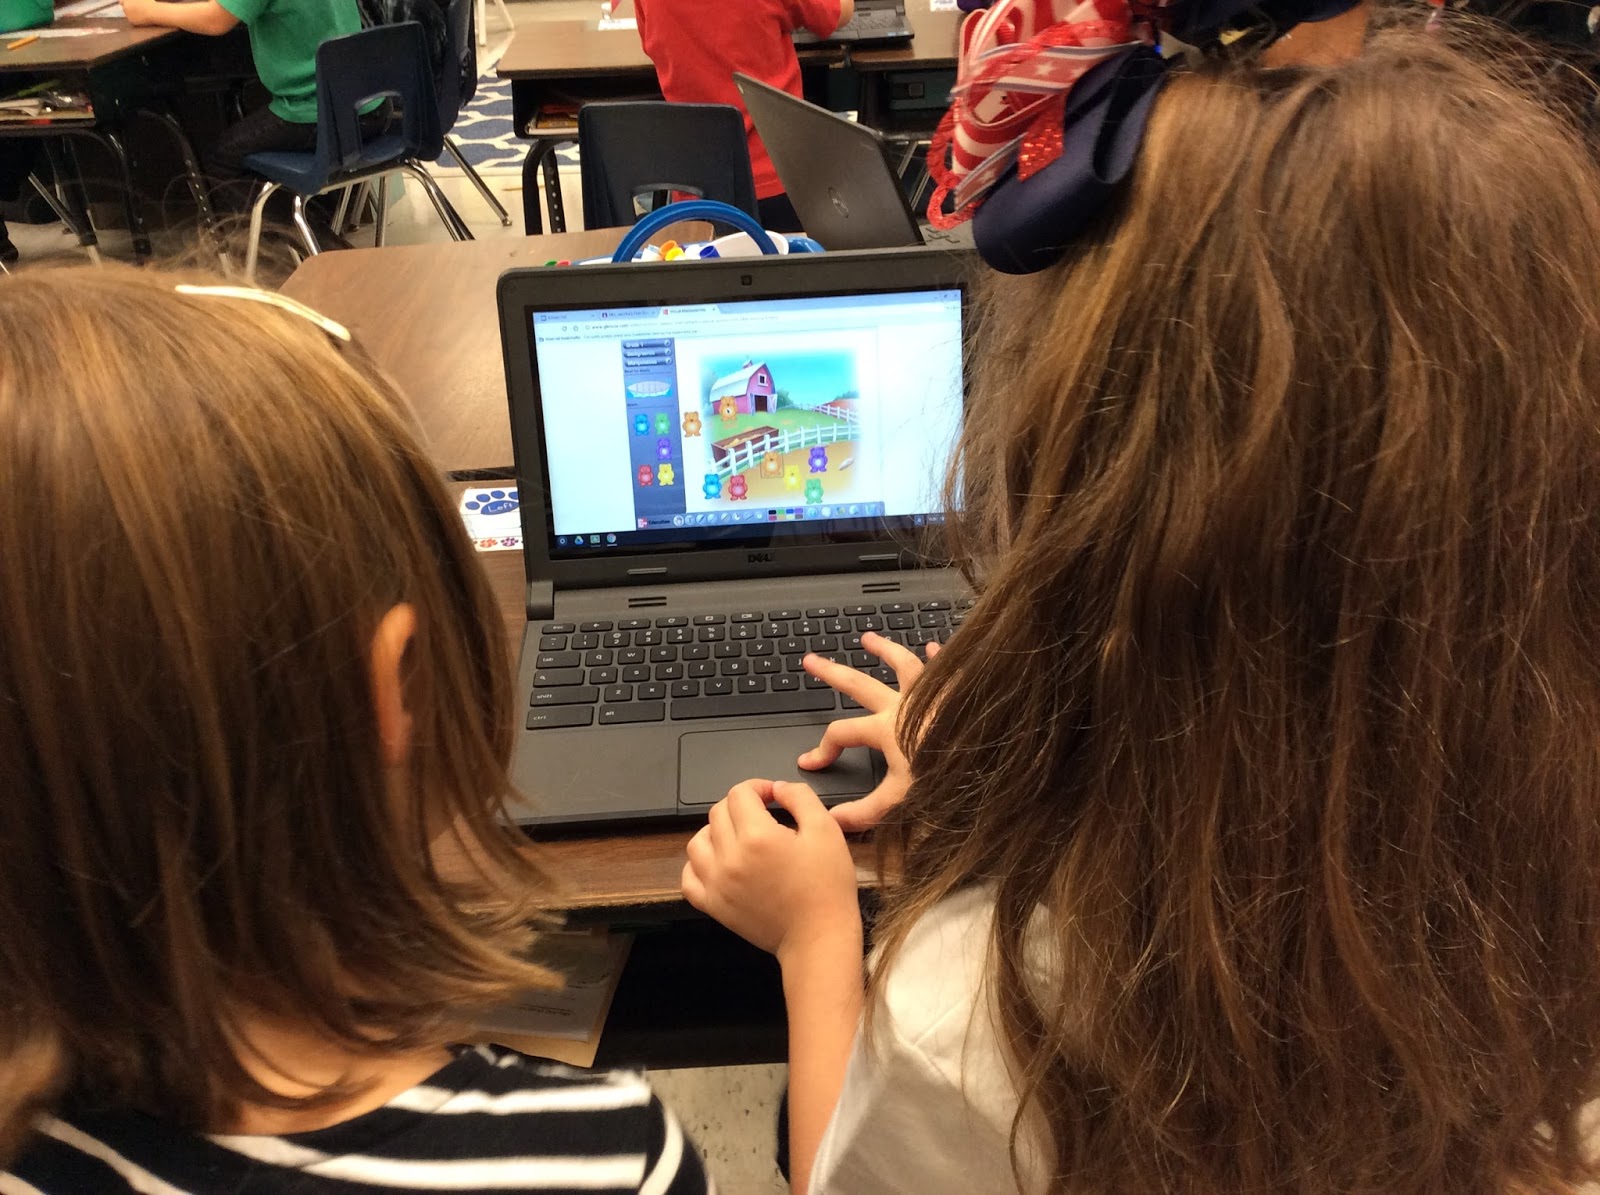
The digital manipulatives that we used were from McGraw-Hill Education. We began the lesson with students using the playground as their background and modeling their problems with bears. Once students were comfortable using the program, they were allowed to pick their own background and manipulatives. The baseball field was a popular choice for the boys.

There are two important buttons on the toolbar that the students need to use. The most important button is for the students to clear objects. For some reason, the students always try to cover the screen with as many bears as possible. Instead of removing the bears one by one, the bears can be removed with one quick button. The other important button is to remove the background.

Students enjoyed exploring the different options that the program had to offer. One group even set the timer for each other when it was time to solve the problem.
Reflection
I should have modeled my expectations for creating word problems more for the students because there was a lot of off task behavior. The students were playing with the digital manipulatives more than creating word problems.
About halfway through the project, I stopped the students and changed the directions. I told the students that one student should have the Chromebook to themselves while they were designing the problem. When they were finished setting the problem up, they should return to their partner and explain their problem to them. This allowed the student to focus more on creating the problem and less time playing with their friend; however, the other student became bored while they were waiting for their partner to create the word problem.
Next time, I will allow both students to have their own Chromebook. Each student can create a problem of their own with their own background and digital manipulatives. When both students are finished creating, they can share their word problem with one another.
Sunday, November 6, 2016
Halloween Writing with the Chromebook
Our project this week was to put everything we had learned so far about Google Drawings into one activity. The student was to insert their picture from a shared folder, insert a relevant picture, and write about their picture. As always, the students had the freedom to pick their own fonts and colors. Happy Halloween!
For directions on how to set up the project for students to insert their own individual pictures from a shared folder, please click here. To learn more about teaching students how to insert a picture into Google Drawings, please click here.
I would love to see what your class is doing with the Chromebooks. Please comment and share the projects that your class is creating with technology.
 |
| I am Ray. What are you going to be for Halloween night? Ray is brave. She helps people when they are hurt. |
For directions on how to set up the project for students to insert their own individual pictures from a shared folder, please click here. To learn more about teaching students how to insert a picture into Google Drawings, please click here.
I would love to see what your class is doing with the Chromebooks. Please comment and share the projects that your class is creating with technology.
Sunday, October 30, 2016
What is Inside Your Head? An Introduction to Inserting Pictures into Google Drawings
This week we talked about schema. Schema is the background knowledge that we use to make connections. We use our schema in both reading and writing; therefore, it is important for students to recognize their own schema.
Usually, I introduce the topic of schema by asking students to reflect on what is in their head. This project includes a picture of a large head in which students draw pictures of things that they are "experts" on. I thought this would be the perfect opportunity for students to learn how to insert pictures on the Chromebook. Therefore, I assigned the students a picture of an empty head in which they could fill with pictures of things that were important to them. This template was created in Google Drawings.

One of the best features of Google Drawings is the ability to search for images without leaving the program. When you insert an image, choose the search tab, and you are able to search through a large amount of images. Students love this feature because they are able to pick the picture that is best for their project.

Here are a few pointers when teaching students to insert pictures into Google Drawings:
1. Spelling is important when searching images. Sometimes if the word is close to the correct spelling, it will work. However, students usually have to spell the word correctly to find their image.
2. Students struggle with resizing the image. When you insert an image into Google Drawings, the image is usually very large. Resizing the image is a task that needs to be modeled constantly for the student. However, by the end of the lesson, the students are successful with this task.
3. The undo button is your friend. Sometimes I would check in on a student and the head would be missing. Usually, we were able to undo enough times to find the head again. Sometimes I had to restore the project to the original version if using the undo feature was not successful.
You can download a copy of schema template here.
Thursday, October 27, 2016
Becoming a Better Writer with Google Drawings
Google Drawings is my favorite program to use with the Chromebook because it offers endless possibilities for student projects. Basically anything that a student creates with a blank sheet of paper can also be created in Google Drawings.
Right now, my students are focusing on writing two or more sentences. This is not an easy task for a first grader but practice makes perfect (or better in the case of a first grader who is still mastering the art of spelling). Last week, we were blessed by a visit from two baby goats. The students loved meeting the goats, so I thought it would be the perfect foundation for a writing activity. Sometimes the best lessons happen by accident and never make it in your lesson plans.
I love teaching writing with technology. This is an excellent opportunity to highlight focus on the capital letter at the beginning of the sentence and the period at the end because editing is super easy on the computer. The students also love to correct their own spelling when the red squiggly line appears, telling them that they have made a mistake.
One thing that I have noticed with writing on the Chromebook is that misspelled words stick out like a sore thumb. In my head, it is okay for students to misspell words when it is in their own handwriting, but when the students misspell words while typing, the teacher inside of me wants to correct it. I am trying to work past this need to control my students and remind myself to let it be because it is their creation.
When using Google Drawings, students are given the freedom to pick their own fonts, colors, and shapes. One of my favorite features of Google is the ability to write in a shape without having to add a text box. It makes it easy to create professional quality work (so easy that a first grader can do it).
The How To: This project was created by assigning a blank Google Drawings document in Google Classroom. Each student had an individual picture taken with one of the goats. All of these pictures were put in a folder in Google Drive and shared with the student's e-mail address so that the folder would appear in the student's Google Drive. The instructional technologist on my campus created a group e-mail for my class so that I was able to quickly share the folder with all of my students using one e-mail address.
Another positive quality of Google Drawings is the ability to insert an image without leaving the program. When the student inserts an image, they pick the option to insert an image from Google Drive. From there, the students can choose the "shared with me" tab or the "recent" tab. Here they are able to pick their picture and insert it into their project. I thought this project was going to be a lot of steps for the students, but they quickly learned the steps to insert their individual picture. Remember, slow and steady wins the race. Start small and add a new technology feature with each new project.
Right now, my students are focusing on writing two or more sentences. This is not an easy task for a first grader but practice makes perfect (or better in the case of a first grader who is still mastering the art of spelling). Last week, we were blessed by a visit from two baby goats. The students loved meeting the goats, so I thought it would be the perfect foundation for a writing activity. Sometimes the best lessons happen by accident and never make it in your lesson plans.
I love teaching writing with technology. This is an excellent opportunity to highlight focus on the capital letter at the beginning of the sentence and the period at the end because editing is super easy on the computer. The students also love to correct their own spelling when the red squiggly line appears, telling them that they have made a mistake.
One thing that I have noticed with writing on the Chromebook is that misspelled words stick out like a sore thumb. In my head, it is okay for students to misspell words when it is in their own handwriting, but when the students misspell words while typing, the teacher inside of me wants to correct it. I am trying to work past this need to control my students and remind myself to let it be because it is their creation.
When using Google Drawings, students are given the freedom to pick their own fonts, colors, and shapes. One of my favorite features of Google is the ability to write in a shape without having to add a text box. It makes it easy to create professional quality work (so easy that a first grader can do it).
 |
| Lady is pretty. Prince is handsome. I did not know that goats can climb. |
The How To: This project was created by assigning a blank Google Drawings document in Google Classroom. Each student had an individual picture taken with one of the goats. All of these pictures were put in a folder in Google Drive and shared with the student's e-mail address so that the folder would appear in the student's Google Drive. The instructional technologist on my campus created a group e-mail for my class so that I was able to quickly share the folder with all of my students using one e-mail address.
Another positive quality of Google Drawings is the ability to insert an image without leaving the program. When the student inserts an image, they pick the option to insert an image from Google Drive. From there, the students can choose the "shared with me" tab or the "recent" tab. Here they are able to pick their picture and insert it into their project. I thought this project was going to be a lot of steps for the students, but they quickly learned the steps to insert their individual picture. Remember, slow and steady wins the race. Start small and add a new technology feature with each new project.
Thursday, October 13, 2016
Exploring with Google Maps
This week we are learning about characteristics of maps. As I was preparing my lesson plans, I tried to remember the last time that I used a paper map. Truthfully, I think the last map I used was at the zoo. When I am driving, I rely on Google Maps. Therefore, I thought this was a great opportunity to introduce the students to how maps have evolved. Of course, we will look at maps on paper, but today we focused on maps that can be used on the computer.
Last week, I sent home a sheet asking the parents for help with this project. I asked them to write down their home address and a special place of interest. I wanted the students to search for locations that were familiar to them. I also added the school because it was a place that I knew they would be successful in finding.

Last week, I sent home a sheet asking the parents for help with this project. I asked them to write down their home address and a special place of interest. I wanted the students to search for locations that were familiar to them. I also added the school because it was a place that I knew they would be successful in finding.

The purpose of the note was to promote independence among students as they are searching for places with Google Maps. However, some of the parents filled out the information for the students, and the students still had to ask me for help because they could not read their parent's handwriting. Next time I send the note, I am going to ask the students to write the information themselves.
The students loved exploring with Google Maps. I gave a quick mini lesson about how to search in Google Maps and how to turn on Street View. I assigned a link to Google Maps in Google Classroom, and the students were off exploring. It was amazing to see how quiet and engaged the students were because they were excited to find their special places on the map.
When using technology, I have learned that you have to let students go where their interests lead them. Some stayed on track looking up their address while others just started exploring. Even though this was not my intention, I had to let my control go. All students were exploring with maps, and that was the purpose of the lesson.
It is amazing the things that the students teach you when they are free to explore technology. One student started searching random places. He started in California and then ended up in Las Vegas. Another student had zoomed out so far from her house that she saw an aerial view of Earth. Some students found their house, turned on street view, and started following the road to a familiar place such as a nearby restaurant. Who knew that Google Maps offered so many learning opportunities for students.
One cool thing that a lot of the students did was change the map to terrain view. This was a neat experience because students were able to see elevations of mountains and density of vegetation in the area. I think when we learn about landforms, we will use Google Maps to look up some well known mountain ranges and different national parks.
Since we live in a rural area, street view was not available for some of the student's houses. These students were super disappointed but were easily redirected when I told them to look up our school. They became happy again when they were successful finding the school. Sonic was another popular location that was easy for the students to find, and some of the students figured out that you could do a virtual tour of the local burger place in our city.
Overall, I was happy with our experience with Google Maps. I think the students will enjoy exploring landforms in the future. I am also contemplating adding Google Maps as a free choice activity on the Chromebooks.
Download the parent letter here.
Sunday, October 9, 2016
Who Am I?
Our project this week was to complete the riddle that accompanies our selfies that we took last week. The students were given a template that I created in Google Drawings, and they had to fill in the blanks about themselves. This is usually a worksheet that the students fill out, but I thought it was the perfect opportunity for the students to practice their technology skills. Here is the template that they were given:

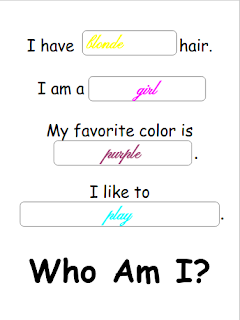

I am proud of the work they completed. Not only were the students able to fill in the blanks with ease, but a lot of them were eager to change the color and the font of the words. There is an epidemic in my classroom where everyone wants to choose the cursive font. We will see how long the cursive font is popular.
The riddles and selfies are in a class book in our classroom. The students love reading the book and answering the riddles. I sometimes hear them ask each other how they added a certain technology feature in their project. I love how they are eager to learn about technology.


Sunday, October 2, 2016
Taking a Picture with the Chromebook
Model...Model...Model. That is my advice when teaching the students to use the camera with the Chromebooks. Even after you explained how to take a photo at least 5 times to the class, the students will still ask a million 100 questions. From experience, I recommend teaching the students to take a picture be the only skill that you teach in your lesson. This skill is a challenge, and teaching more skills after taking the picture only adds a headache for yourself. Believe me; I have made the mistake once twice now.
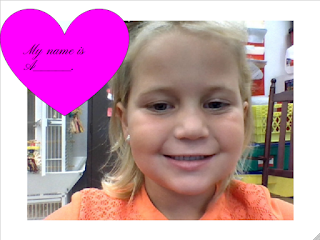
Of courselike an fool I did not follow my own advice to only take a picture the first time you introduce the students to the front facing camera on the Chromebook. Our project this week was to take a selfie, and write a sentence: My name is ______. Writing a sentence is simple when the students have a template. With this project, they started with a blank Google Drawings document; therefore, they had to insert their own shape and type a sentence in the shape (both new skills).
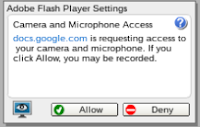
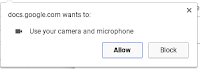
I repeat: The first time you take a picture on the Chromebook, let it be the only thing that you do on the project and take a break. You can add more later, but taking a picture for the first time is difficult for the students. When you insert an image into Google Drawings, you choose the option to Take a Snapshot. In order to use the camera, you have to allow the program access to your camera not once but twice. See the images below (both images will pop up, but students have to hit allow on both for the camera to work).
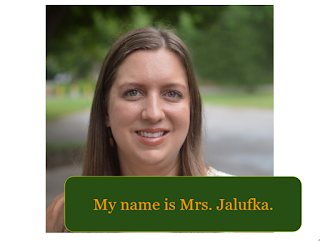
This project will be part of a Who Am I? class book that the students are making. The first page tells riddles about the students; the second page shows a picture and the student's name. Usually, the students draw a picture of themselves on paper; however, I thought this would be the perfect chance to teach the students how to use the camera on the Chromebook. Here is an example that I created. You will see my lovely face as an example because I have not asked for parent permission to use student images on my blog (yet). Enjoy!
Of course
I repeat: The first time you take a picture on the Chromebook, let it be the only thing that you do on the project and take a break. You can add more later, but taking a picture for the first time is difficult for the students. When you insert an image into Google Drawings, you choose the option to Take a Snapshot. In order to use the camera, you have to allow the program access to your camera not once but twice. See the images below (both images will pop up, but students have to hit allow on both for the camera to work).


This project will be part of a Who Am I? class book that the students are making. The first page tells riddles about the students; the second page shows a picture and the student's name. Usually, the students draw a picture of themselves on paper; however, I thought this would be the perfect chance to teach the students how to use the camera on the Chromebook. Here is an example that I created. You will see my lovely face as an example because I have not asked for parent permission to use student images on my blog (yet). Enjoy!

Sunday, September 25, 2016
High Expectations
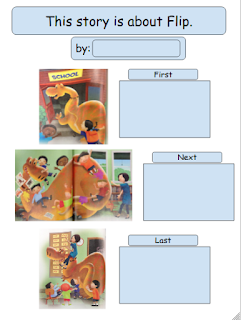
This week our project focused on retelling a familiar story. We read the story of Flip all week and practiced retelling the beginning, middle, and end of the story. On Friday, it was time for the students to record their what they learned.
Usually, students are expected to write one sentence at the beginning of the year. Each sentence is supposed to contain a capital letter, punctuation, and make sense. With this project, I was asking the students to write 3 sentences. I hoped I wasn't pushing their limits.
For the project, I took pictures of pages from the story at the beginning of the story, in the middle of the story, and at the end of the story. I created an outline for the project using Google Drawings and assigned the project through Google Classroom.
Before we started the project, I gave the students a quick lesson on how to use capital letters on the keyboard and where to find the period. These skills were going to be essential in writing a sentence. I used an image of a keyboard on the projector to explain these keyboarding skills.
After our quick lesson, it was time to set the students free. I was impressed how the students rose to the high expectations that I set. They were becoming a little frustrated with spelling so I added a few key words that they needed from the story to the word wall. I usually do not help with spelling, but I thought these hints would make the task of typing less dreadful.
Below you can see an example of their project. The first image is the template that I assigned each student; the second image is a student product (notice the change in font color from the previous lesson). One of our next lessons will be the secret of how to correct spelling when the red squiggly line appears.


Slow and Steady Wins the Race
We are reading The Rabbit and the Hare this week. I think it relates well to technology in the classroom. Start with the basics and slowly add more each week. If you race to the finish line, you will only be frustrated and your students will not be successful. This week we are starting with the basics by typing the alphabet.
At the start of each school year, I ask the students to write their alphabet on a piece of paper to see if they know the order of their letters. I am not looking at letter formation at this time; therefore, I thought this was the perfect first project on the Chromebook. Not only will they be allowed to show the skill of knowing the letters of the alphabet in order, but they will also have the opportunity to locate each letter on the keyboard.
I knew that this might be an easy task for some of the students who have experimented with technology at home. I added a little spice to the project for these students: teaching them how to change the font color. When I modeled how to change the font color, you would have thought I just passed out candy. They were so excited to play with the colors. Check out some of their finished projects below. I am proud of the creativity that they added to this very simple task.
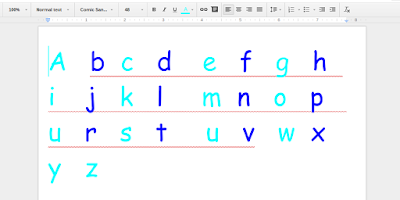
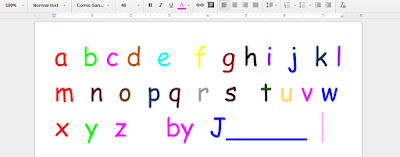


Sunday, July 24, 2016
Exploring Technology Together
I once read that teaching technology is like being a first year teacher again. Every step of the process has to be planned and procedures have to be in place. It is very easy to run away from feel overwhelmed with technology. But let me tell you, it is worth it. Students (even at the elementary age) can be successful when given the proper tools and guidance.
Let me tell you a little about my background. This will be my 9th year teaching first grade. I have always taught first grade, and I believe in the power of authentic reading and writing. I know that technology can never replace the physical book, but I believe that there are countless places where technology can enhance our curriculum. Last January, our campus received four carts of Chromebooks. Therefore, my experience with truly integrating technology isinadequate limited, but I am astonished at what my students were able to accomplish with such little time.
I invite you on this journey exploring technology with me and my students. It is my purpose to share my experience in the classroom with you (both the good and theugly bad). Please feel free to comment about your experience in the classroom, share what works (or didn't work) with us and ask questions. It looks like everyone is learning about this ever changing thing called technology together.
Let me tell you a little about my background. This will be my 9th year teaching first grade. I have always taught first grade, and I believe in the power of authentic reading and writing. I know that technology can never replace the physical book, but I believe that there are countless places where technology can enhance our curriculum. Last January, our campus received four carts of Chromebooks. Therefore, my experience with truly integrating technology is
I invite you on this journey exploring technology with me and my students. It is my purpose to share my experience in the classroom with you (both the good and the
Subscribe to:
Posts (Atom)